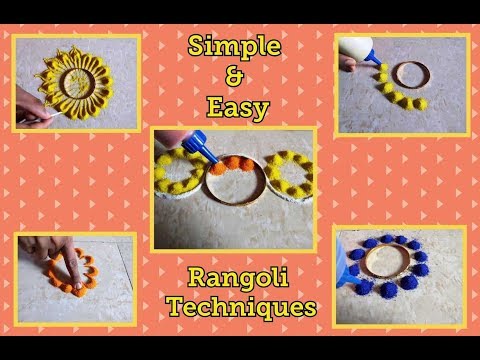
In the previous part, we have seen how to make simple and easy rangoli using hand and Ear Bud. In this part, we will see how to use bangles to make easy rangoli designs.
पिछले भाग में, हमने देखा है कि हाथ और ईरबड का उपयोग करके सरल और आसान रंगोली कैसे बनाना है। इस भाग में, हम देखेंगे कि आसान रंगोली डिज़ाइन बनाने के लिए चूड़ियों का उपयोग कैसे करें।
Namaste Guys!! Welcome to A 2 Z Guides!! Let's discuss in detail.
नमस्ते दोस्तों !! ए 2 जेड गाइड में आपका स्वागत है !! चलो विस्तार से चर्चा करते हैं।
Just like they are useful in hand they are useful while not in hand too. Just like they increase the beauty of hand they increase the beauty of our rangoli too.

जैसे वे हाथ में उपयोगी हैं, वे हाथ में नहीं होने पर भी उपयोगी होते हैं। जैसे ही वे हाथों की सुंदरता बढ़ाते हैं, वे हमारे रंगोली की सुंदरता भी बढ़ाते हैं।
Bangles:-
Just like they are useful in hand they are useful while not in hand too. Just like they increase the beauty of hand they increase the beauty of our rangoli too.

जैसे वे हाथ में उपयोगी हैं, वे हाथ में नहीं होने पर भी उपयोगी होते हैं। जैसे ही वे हाथों की सुंदरता बढ़ाते हैं, वे हमारे रंगोली की सुंदरता भी बढ़ाते हैं।
Let's check out some examples of easy techniques using bangles...
आइए चूड़ियों का उपयोग करके आसान तकनीकों के कुछ उदाहरण देखें ...Border Rangoli Using Bangle
Step 1:
As shown in Picture 1.1, start pouring rangoli in a straight line. Now take a bangle and create a shape by pressing it on either side of the line as shown in Picture 1.2.
 |
| Picture 1.1 |
 |
| Picture 1.2 |
जैसा कि Picture 1.1 में दिखाया गया है, एक सीधी
Step 2:
Now place the bangle in each shape and make dots at the inside edges of the bangle. Make sure you use a different color on either side of shapes. Now push those dots gently downwards to create petals shape.
 |
| Picture 1.3 |
 |
| Picture 1.4 |
अब प्रत्येक आकार में कंगन रखें और कंगन के अंदर के किनारों पर बिंदु बनाएं। सुनिश्चित करें कि आप आकार के दोनों तरफ अलग रंग का उपयोग करें। पंखुड़ियों के आकार को बनाने के लिए अब उन बिंदुओं को धीरे-धीरे नीचे दबाएं।
Step 3:
Now pour some other color dots at the center and with the help of small-cap push it gently to create the circle.
 |
| Picture 1.5 |
 |
| Picture 1.6 |
अब केंद्र में कुछ अन्य रंग बिं
Step 4:
Finally, pour a different color at the center of those dots & push them gently using a finger.
 |
| Picture 1.7 |
 |
| Picture 1.8 |
आखिरकार, उन बिंदुओं के केंद्र
Flower Rangoli Using Bangle and Hand
Step 1:
As shown in Picture 2.1, place the bangle and start pouring rangoli at the outside edges of the bangle. Then remove the bangle and push the dots outward side. (As shown in Picture 2.2)
 |
| Picture 2.1 |
 |
| Picture 2.2 |
जैसा कि Picture 2.1 में दिखाया गया
Step 2:
Now take a different color & start pouring rangoli in between those shapes created. Then push those dots gently downwards to create petals shape.
 |
| Picture 2.3 |
 |
| Picture 2.4 |
फिर एक अलग रंग लें और बनाए गए
Step 3:
Then pour some different rangoli & start rolling your finger in a circular way to make a circle.
 |
| Picture 2.5 |
 |
| Picture 2.6 |
फिर कुछ अलग रंगोली डालें और एक सर्कल बनाने के लिए अपनी उंगली को गोलाकार तरीके से घुमाएं।
Step 4:
Now pour same color dot as like the outer border at the center & push it gently to create a circle.
 |
| Picture 2.7 |
 |
| Picture 2.8 |
Flower Rangoli Using Bangle And Ear Bud
Step 1:
As shown in the picture, place the bangle & start pouring rangoli dots at the equal distance around it.
 |
| Picture 3.1 |
Step 2:
Now remove the bangle and with the help of earbud start pushing those dots towards the center.
 |
| Picture 3.2 |
Step 3:
Now again place the bangle back to the similar position and with the help of it start creating petals as shown in the picture.
 |
| Picture 3.3 |
अब फिर से कंगन को उसी स्थिति में रखें और इसकी मदद से चित्र में दिखाए गए पंखुड़ियों को बनाना शुरू करें।
Step 4:
Finally, fill any color of Rangoli inside the bangle.
 |
| Picture 3.4 |
अंत में, किसी भी रंग के रंगोली के साथ कंगन के अंदर रंग भरें।
Some of you guys requested for stepwise pictures of example designs shown in the last blog. So here are they:-


 |
| Step 1 |
 |
| Step 2 |
 |
| Step 3 |
 |
| Step 4 |
 |
| Step 5 |
 |
| Step 6 |
Example 3:
 |
| Step 1 |
 |
| Step 2 |
 |
| Step 3 |
 |
| Step 4 |
 |
| Step 5 |
 |
| Step 6 |
That's it for today. See you soon where we will see Simple and Easy Rangoli Techniques using Cap(Dhakkan) and Fork. If you like this article helpful then do share it with your friends and family.
आजके लिए इतना ही। जल्द ही मिलेंगे जहां हम कैप (ढक्कन) और फोर्क का उपयोग करके सरल और आसान रंगोली तकनीकों को देखेंगे। अगर आपको यह लेख उपयोगी लगता है तो इसे अपने दोस्तों और परिवार के साथ साझा करें।
In case if you haven’t checked out Part 1 of “Making Rangoli is Very Simple and Easy” then here is its link:-
Making Rangoli is Very Simple & Easy (Part 2)
 Reviewed by A 2 Z Guides
on
Monday, November 05, 2018
Rating:
Reviewed by A 2 Z Guides
on
Monday, November 05, 2018
Rating:
Reviewed by A 2 Z Guides
on
Monday, November 05, 2018
Rating:


Soo. Nice ...... Rangoli😍😍
ReplyDeleteSuperb🤩👍
ReplyDeleteThank You!
DeleteBeautiful rangoli
ReplyDeleteThank You!
DeleteThis one is very easy..I'll definitely try
ReplyDeleteThank You! our motive was to show you easy techniques so that you can try it
Deleteखूपच सुंदर इनोवेशन....👌
ReplyDeleteधन्यवाद!
DeleteEk number
ReplyDeleteThank You!
Deletemast cha ...............:)
ReplyDelete